Creating an app
For this tutorial, we will create a Vet app. The requirements of this app are:
Pets are to be registered. Pets have a name and are a certain kind of animal (selectable from a catalogue of animals).
New kinds of animals can be added to the catalogue as needed.
Each visit to the vet is to be recorded.
Each visit is associated with a previously registered Pet, and certain information about the visit is asked: the date, and notes about the visit.
The script new_app automatizes the steps needed to create an app. It creates the needed
folder structure and also creates a file with blank configuration variables for you to fill
out (the name of this file will the app name prefixed by a dot). Run the script and pass the
desired app name as its sole argument.
./new_app vet
This will create the folder apps/vet/, and a configuration file .vet. Enter the credentials for a
PostgreSQL instance in the .vet file.
flr_app=vet
flr_app_title=My Vet App
flr_db_name=vet_app
flr_db_host=localhost
flr_db_user=mypostgresuser
flr_db_pass=mysecretpassword
You can also change the flr_admin_pass value to whatever you like or leave it like that.
It is the password used to log in as admin.
flr_admin_pass=VerySecretPassword
Defining models
For this app we’ll need an Animal model, a Pet model and a Visit model.
Models are written using the Peewee ORM. Refer to Peewee’s documentation for an in-depth
explanation of the ORM features
All models must inherit flr’s BaseModel (which in turn inherits from the Peewee Model but
with some flr-specific boilerplate added).
For this app we will put all three models in the same file. Create the file models/vet.py
models/vet.py
import peewee as pw
from flr import BaseModel

class Animal(BaseModel):
    name = pw.CharField(verbose_name="Animal name")

Animal.r()

class Pet(BaseModel):
    name = pw.CharField(verbose_name="Pet's name")
    animal = pw.ForeignKeyField(Animal, verbose_name="Animal")

Pet.r()

class Visit(BaseModel):
    pet = pw.ForeignKeyField(Pet, verbose_name="Pet")
    visit_date = pw.DateField(verbose_name="Visit date")
    notes = pw.TextField(verbose_name="Notes", null=True)

Visit.r()
The verbose_name parameter is optional. It will be used as the label for that field in
forms, and as the column header in list views. Otherwise the label will be derived from the
field name itself. Notice that by default all fields will be not-null unless you pass
null=True. Also notice the r() call after each model definition (this calls a
routine that, among other things, adds the class to a Registry dictionary
that can be imported from anywhere and thus give you access to any model from any file.
For more information see ___).
Don’t forget to add the models to the init file so they are imported when the app runs.
models/__init__.py
from . import vet
We can now start the server. Use the provided script run.sh.
./run.sh vet
When prompted enter yes to create the necessary tables in the database.
However, if you now navigate to localhost:6800 and log in (user: admin, password: the one
defined in the flr_admin_pass variable) you won’t see these models anywhere yet!
This is because there’s one more step needed, and thats defining the menus and views.
Defining views
Views are defined using JSON files. Any JSON file placed inside the data/ folder
(already created by the new_app script) will be loaded at server startup.
Each of these files is expected to contain a list of objects, each object being a record
to be inserted in the database. The general structure of each of these objects is
{
    "model": string,
    "meta_id": string,
    "data": object
}
The model property indicates into which table the record must be inserted. It must be
a string corresponding to the name of a Model. The meta_id property is a string which
will function as an user-defined id to the record that is being created. This allows for
records to be referenced by one another without depending on the actual id they have inside
the database table, and also allows for the records to be recognized with each successive
server startup. This way, on successive startups, records won’t be actually created again,
just maybe updated. Finally, the data property consists of an object containing the
record’s desired values.
Each section, menu, and view is actually just a regular record in the database. Sections
are defined by the FlrSection model, menus by the FlrMenu model, and views by
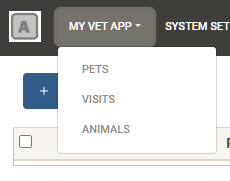
the FlrView model. We will create a single section called “My Vet App” which will contain
the following menus: “Pets”, “Visits” and “Animals”. Create the file data/menus.json.
data/menus.json
[
    {
        "model": "FlrMenuSection",
        "meta_id": "section_vet",
        "data": {
            "name": "My Vet App",
            "sequence": 1
        }
    },
    {
        "model": "FlrMenu",
        "meta_id": "menu_pets",
        "data": {
            "name": "Pets",
            "sequence": 1,
            "section_id_META_ID": "section_vet"
        }
    },
    {
        "model": "FlrMenu",
        "meta_id": "menu_visits",
        "data": {
            "name": "Visits",
            "sequence": 2,
            "section_id_META_ID": "section_vet"
        }
    },
    {
        "model": "FlrMenu",
        "meta_id": "menu_animals",
        "data": {
            "name": "Animals",
            "sequence": 3,
            "section_id_META_ID": "section_vet"
        }
    }
]
Now, for the menus to actually do something when clicked we must define the views. Each menu can open one or more views. Normally we want it to open both the list and the form view, but it can be just the list view or just the form view if desired. Each view definition describes the fields to be shown and their layout. List view definitions basically are just a list of fields, but the definition of form views can be a little more intricate, as it can be divided into several sections and contain action buttons. Each field can be further configured (for example, to override its default label or mark it as required). See ___ to learn all the possible options that can be passed to fields.
Create the file data/views.json
data/views.json
[
    {
        "model": "FlrView",
        "meta_id": "animal_list_view",
        "data": {
            "name": "Animal list view",
            "model": "Animal",
            "view_type": "list",
            "definition": {
                "structure": [
                    {"field": "name"}
                ]
            },
            "menu_id_META_ID": "menu_animals",
            "sequence": 1
        }
    },
    {
        "model": "FlrView",
        "meta_id": "animal_form_view",
        "data": {
            "name": "Animal form view",
            "model": "Animal",
            "view_type": "form",
            "definition": {
                "structure": [
                    {"field": "name"}
                ]
            },
            "menu_id_META_ID": "menu_animals",
            "sequence": 2
        }
    },
    {
        "model": "FlrView",
        "meta_id": "pet_list_view",
        "data": {
            "name": "Pet list view",
            "model": "Pet",
            "view_type": "list",
            "definition": {
                "structure": [
                    {"field": "name"},
                    {"field": "animal"}
                ]
            },
            "menu_id_META_ID": "menu_pets",
            "sequence": 1
        }
    },
    {
        "model": "FlrView",
        "meta_id": "pet_form_view",
        "data": {
            "name": "Pet form view",
            "model": "Pet",
            "view_type": "form",
            "definition": {
                "structure": [
                    {"field": "name"},
                    {"field": "animal"}
                ]
            },
            "menu_id_META_ID": "menu_pets",
            "sequence": 2
        }
    },
    {
        "model": "FlrView",
        "meta_id": "visit_list_view",
        "data": {
            "name": "Visit list view",
            "model": "Visit",
            "view_type": "list",
            "definition": {
                "structure": [
                    {"field": "pet"},
                    {"field": "visit_date"},
                    {"field": "notes"}
                ]
            },
            "menu_id_META_ID": "menu_visits",
            "sequence": 1
        }
    },
    {
        "model": "FlrView",
        "meta_id": "visit_form_view",
        "data": {
            "name": "Visit form view",
            "model": "Visit",
            "view_type": "form",
            "definition": {
                "structure": [
                    {"field": "pet"},
                    {"field": "visit_date"},
                    {"field": "notes"}
                ]
            },
            "menu_id_META_ID": "menu_visits",
            "sequence": 2
        }
    }
]
We can also load some initial data in our database, for example let’s add some animals to the Animal
catalogue. Create the file data/animals.json.
data/animals.json
[
    {
        "model":"Animal",
        "meta_id": "animal_dog",
        "data": {
            "name": "Dog"
        }
    },
    {
        "model":"Animal",
        "meta_id": "animal_cat",
        "data": {
            "name": "Cat"
        }
    }
]
NOTE: the files present in the data/ folder will be loaded in alphabetical order.
Now stop and run the server again. The menus and views will be loaded into the database.
Go to localhost:6800 and you will now see the “My Vet App” section.
And that’s it! The application is now fully functional, new records can be created, and existing ones can be edited and deleted.
Logos and custom styles
You may have noticed that there is a generic logo both in the login screen and in the navbar.
To use your own logos, place your images in the public/ folder. The files must be named
logo.png and logo_navbar.png.
You can change the overall theme of the application by editing or replacing the bootstrap.min.css file.
The default file is a theme from https://bootswatch.com/. You can download any other and overwrite it.
You can also include a file named global.css with any rules you like.